
Many home insurance claims involve water damage, and roof leaks are a common cause. You may spot damp insulation, dark wood stains, peeling paint, or a musty attic smell before you see dripping water. Quick action can limit damage, but the real question is whether you can dry, repair, or replace the affected materials before mold takes hold.
Key Takeaways
- Look for damp insulation, dark wood stains, musty odors, and rusted fasteners in the attic, especially under valleys or flashing.
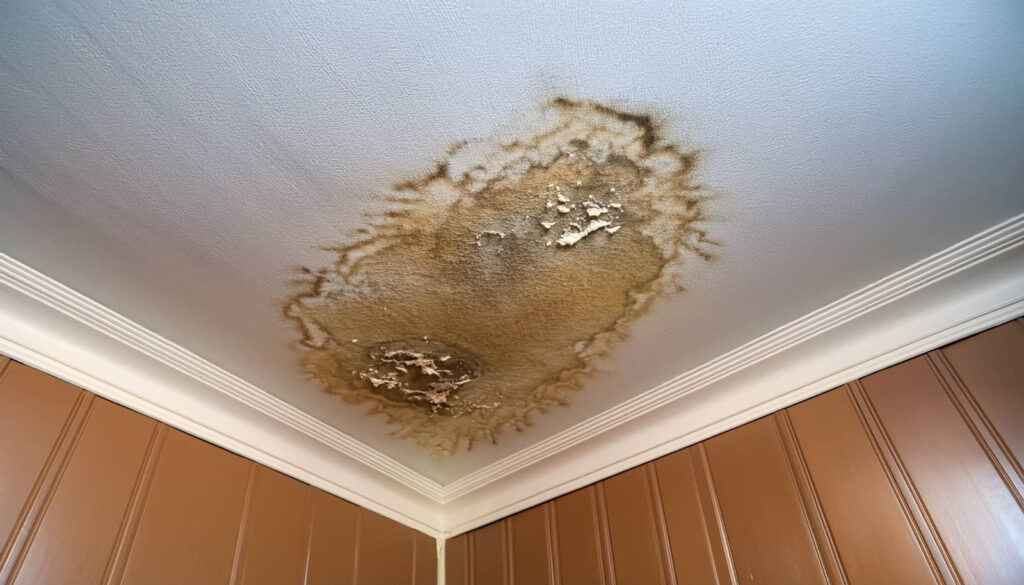
- Check ceilings and walls for brown or yellow staining, peeling paint, bubbling drywall, soft spots, and moisture near fixtures or seams.
- After a leak, move belongings, shut off power near wet areas, contain drips, and dry the space with fans and dehumidifiers.
- Repair small leaks with targeted fixes like replacing loose shingles, damaged flashing, or vents, but replace soaked insulation or warped drywall.
- Prevent future damage by inspecting the roof seasonally, clearing gutters, sealing nail heads, and addressing cracks or loose fasteners early.
What Roof Leak Water Damage Looks Like
If you catch a roof leak early, you’ll usually see water damage first in the attic, where damp insulation, dark wood staining, or dripping may appear near the leak source.
You may also notice a musty odor, warped sheathing, or rusted fasteners around the wet area.
With water damage from roof leaks, the stain edges often look brown, yellow, or gray, and the material can feel soft, swollen, or brittle.
You should check for mold growth, because trapped moisture creates a good environment for it.
If you belong to a maintenance team or handle your own home repairs, act quickly: trace the moisture path, dry the space, and document the damage.
Early response helps you protect the structure and avoid larger repair bills.
Where to Spot Water Damage in Ceilings
After you spot attic moisture, check the ceiling below the leak path for signs of water damage.
Focus on areas where water usually settles and spreads, especially after rain. You’ll often see staining, soft texture, or small blisters in painted surfaces. Use a flashlight and look closely at joints, corners, and around penetrations.
If your home’s crew has settled in for repairs, these checks help you stay ahead of bigger costs.
- Ceiling edges near exterior walls
- Around light fixtures and vents
- Along seams in drywall or plaster
- Under roof valleys or flashing lines
Press gently; sagging can mean the material has absorbed water.
Mark each spot, then track changes after the next storm. If the stain grows, act quickly and document it.
Water Damage Signs in Walls and Attics
Walls and attic spaces often reveal roof-leak damage before the problem reaches finished rooms. You may notice dark staining on rafters, sheathing, or wall tops, plus damp insulation that mats down or clumps.
Look for peeling paint, bubbling drywall, and warped trim along exterior walls. Musty odors, rust on fasteners, and water tracks around nails or seams also point to active moisture.
In the attic, check for daylight gaps near penetrations, wet framing, or frost-like spots that signal recurring leaks. If you see sagging drywall or soft wallboard, the material has likely absorbed enough water to weaken.
Your home stays stronger when you catch these signs early, so inspect after storms and compare dry areas with suspect ones.
What to Do First After a Roof Leak
Once you spot roof-leak damage in walls or the attic, act fast to limit spread. Protect your home and your crew by staying calm and working methodically.
First, move furniture, boxes, and electronics out of the wet zone. Then, shut off power to affected circuits if water’s near outlets or fixtures.
Next, place buckets or pans under drips and lay towels to catch runoff. Finally, run fans and a dehumidifier to lower humidity and slow mold growth.
- Remove valuables from damp areas.
- Disconnect electricity only if it’s safe.
- Contain dripping water with clean containers.
- Ventilate the space and monitor moisture.
You’re not alone here; quick action helps you keep damage small and sets up a cleaner repair process.
How to Trace the Leak Source
Start tracing the leak at the highest wet point, because water often travels along framing before it shows up below.
Check the attic, roof deck, and top plates for stains, drips, rusted fasteners, and darkened insulation.
Follow each wet path uphill, using a flashlight to spot sheen or discoloration.
Outside, inspect shingles, flashing, vents, skylights, chimneys, and valleys for gaps, lifted edges, or cracked sealant.
Hose-test one area at a time while someone watches inside, and keep your pattern controlled so you can isolate the entry point.
Mark suspect spots with painter’s tape and photos.
If the source sits near a penetration or seam, tighten or reseal it after you confirm it.
You’ve got this, and a methodical search keeps your crew aligned.
How to Dry Wet Materials Before Mold
First, remove any standing water with a wet vac, towels, or a pump so wet materials stop absorbing moisture.
Then increase air circulation with fans and a dehumidifier to speed surface drying and lower humidity.
Finally, open access to hidden cavities in ceilings, walls, or attic spaces so trapped moisture can dry before mold starts.
Remove Standing Water
Remove standing water right away to limit how far moisture spreads into your attic, ceilings, and walls. You’ll protect nearby materials faster when you act methodically and keep the area controlled.
First, shut off affected circuits if water reaches fixtures. Then remove pooled water with a wet vacuum, pump, or absorbent towels, depending on depth. Next, pull up saturated rugs, insulation, or loose debris so trapped moisture doesn’t linger.
Finally, place wet drywall, trim, and framing on clean supports so you can inspect them.
- Use clean tools only.
- Empty collection containers often.
- Check hidden corners for seepage.
- Stop when materials feel damp, not soaked.
If you’re organized and steady, you’ll help your home recover with less damage and fewer surprises.
Increase Air Circulation
Open windows, doors, and vents to move humid air out and help wet framing, drywall, and insulation dry before mold can take hold.
You’ll speed evaporation when you create a steady crossflow through the damaged area. Use box fans or axial fans to push air across surfaces, and keep them running continuously while materials stay damp.
Raise HVAC fan settings if your system can circulate air safely, but don’t use heat that could warp finishes or trap moisture.
Keep furniture, rugs, and storage clear so air reaches every exposed surface. Check humidity with a meter; aim to keep it low and stable.
If you’re working with your crew, coordinate airflow so everyone dries the same zone, not just the open center.
Dry Hidden Cavities
Once you’ve improved airflow in the open room, focus on concealed spaces where moisture lingers and mold starts fast. You’ll need to open access panels, pull baseboards, and check insulation, framing, and ceiling cavities.
Use a moisture meter to find damp spots, then dry them with dehumidifiers, fans, and gentle heat. Remove wet porous materials that won’t dry quickly.
- Inspect hidden cavities.
- Measure moisture levels.
- Dry with controlled airflow.
- Replace damaged materials.
Keep surfaces below mold-friendly moisture content, usually within 24 to 48 hours.
If you share the space with others, work methodically so everyone stays safe and the repair stays on track. Seal leaks before closing walls, or trapped moisture can return and spread damage.
When Roof Repairs Are Enough
If the leak is caught early and the damage stays limited to the roofing system, roof repairs may be enough to stop further water intrusion. You can often fix loose shingles, cracked flashing, failed sealant, or damaged vents before moisture spreads.
A focused repair works best when the decking is sound, fasteners still hold, and you don’t see widespread sagging or soft spots. After the repair, you should verify the area stays dry during the next storm and inspect adjoining roof sections for matching wear.
Keep the fix targeted, because you want your roof team to preserve the structure you already have. When the source is isolated and the roof can shed water again, repair is usually the fastest, most practical path for your home and household.
When to Replace Water-Damaged Materials
When water damage has soaked insulation, warped drywall, stained ceiling materials, or weakened structural wood, replacement is usually the safer option. You shouldn’t try to salvage materials that stay soft, swollen, or crumbly after drying.
Hidden moisture can keep spreading damage, so act quickly and keep your crew on the same page. Replace components when you see:
- Persistent staining or odor
- Mold growth or discoloration
- Loss of strength, sagging, or delamination
- Rusted fasteners or deteriorated backing
If water reached electrical boxes, ceiling assemblies, or load-bearing framing, replacement protects your home’s structure and your household’s safety.
A qualified inspector can confirm what must go and what can stay, so you’re not guessing.
How to Prevent Future Roof Leak Damage
To prevent future roof leak damage, you need to stop water at the source and maintain the roof system before minor defects turn into major failures.
Inspect shingles, flashing, vents, and skylights every season, and after storms, so you can catch cracks, loose fasteners, and lifted edges early. Clear gutters and downspouts to keep runoff moving away from the roof deck and fascia. Trim branches that rub or drop debris, and seal exposed nail heads, seams, and penetrations with compatible roofing products.
In the attic, check for damp insulation, stains, or rust, because hidden moisture can signal a leak. If you’re unsure, bring in a qualified roofer; working with the right team helps you protect your home and stay ahead of repairs.
Frequently Asked Questions
How Quickly Can Roof Leak Water Damage Lead to Mold Growth?
You can see mold start within 24 to 48 hours after roof leak water damage, especially in warm, humid spaces. Dry the area quickly, fix the leak, and remove wet materials to stop growth.
Can a Small Roof Leak Cause Hidden Structural Damage?
Yes—a small roof leak can quietly rot decking, rafters, and framing. You may miss it until stains, sagging, or soft spots appear. Check attic insulation, sheathing, and fasteners, and fix leaks fast.
Does Homeowners Insurance Cover Roof Leak Water Damage?
Usually, yes—if a sudden event caused it. Many homeowners claims involve water damage, so you’re not alone. You should check your policy, because wear, neglect, and gradual leaks are often excluded.
Should I Test Indoor Air After a Roof Leak?
Yes, you should test indoor air after a roof leak if you smell mustiness or see mold; you may have hidden contamination. You can hire a certified inspector to verify moisture, spores, and safety.
Can Roof Leak Stains Appear Far From the Actual Leak?
Yes—stains can show up far from the source; water often travels 10–20 feet along framing before dripping. You’ll feel more confident when you inspect attic sheathing, insulation, and ceiling penetrations carefully.
Conclusion
Spotting water damage from roof leaks early helps you act before minor staining becomes major repair. Check ceilings, walls, and attics for soft spots, peeling paint, dark stains, and musty odors; then trace the source, dry materials fast, and repair or replace what’s damaged. Isn’t prevention cheaper than replacement? With regular inspections, prompt fixes, and proper ventilation, you can protect your home, reduce mold risk, and stop one leak from becoming a costly cascade.